One of my biggest projects recently was a PVP first person shooter where I had to work on the design of a complicated character traversal and navigation. This article is an attempt to present my experience in a systemic manner with a specific focus on the character feel of the first person games (and also build on top of my previous article about game controls design you could probably read before).
The article will cover the following topics:
- Game controls and responsiveness metrics from the Human-Computer Interaction perspective.
- Aiming & aim assists from the Human-Computer Interaction perspective.
- First person character perception and how to address the motion sickness problem.
Game Controls & Responsiveness
Hand Limitations
Any controls starts from the default position of the hands and physical hand limitations.
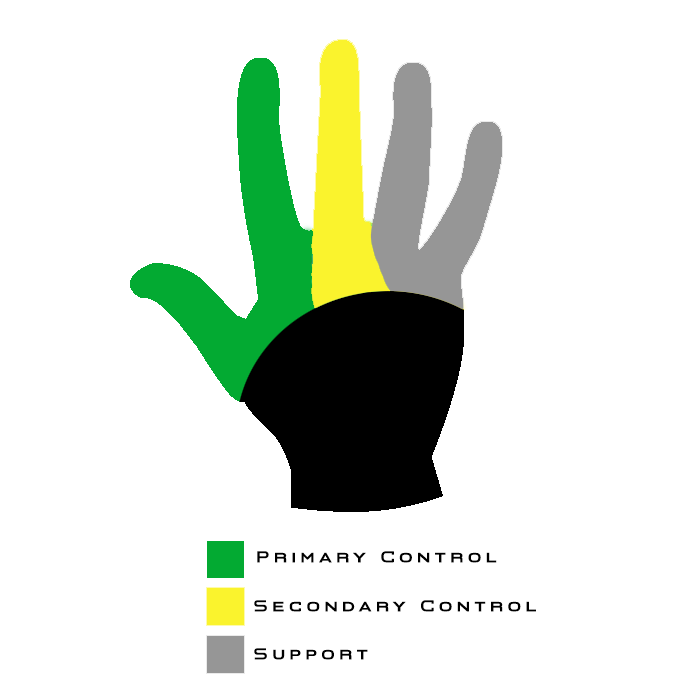
There are three main “finger groups” that we need to keep in mind during controls design:
- Primary control – thumb & index fingers. Flexible and precise, usable for primary actions (shoot, jump, etc.).
- Secondary control – middle finger. Flexible but not so precise, usable for primary hold actions (aiming mode, [w] for walking, etc.).
- Support – ring & pinkie fingers. Weak and not very flexible, can be used for secondary actions.
There are also some accessibility considerations you might want to take into account:
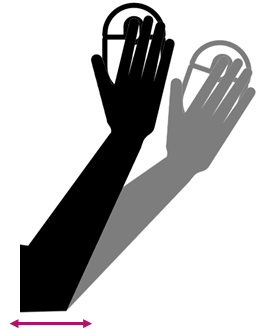
- Handedness – around 8 to 15% of people are left-handed. It is, however, not an either-or condition but rather a continuum, with people being right- or left-handed to a certain degree, or even ambidextrous without clear hand dominance (which also means that preferred control layouts can be different for different left-handed players).
- Range of Motion – some of the common hand disability types limits the player’s ability to manage range of motion, making it difficult to perform either precise small motions, or vice versa – perform larger and less precise motions. Sensitivity/acceleration settings are crucial for these players.
- Physical Effort – for some players, any actions that require considerable physical effort, can be very hard to perform (e.g. repeated button mashing, button hold for a long time). These actions can be especially frustrating when combined with the timing/precision requirements (e.g. QTE).
By combining the hand limitations knowledge and physical layout of the input device, we can apply the Fitts’ Law to the game controls mapping:
The most frequently used actions should be in the most accessible places and match primary control group of the player’s hand.
This will allow us to build Usability Tiers for various input devices, like mouse & keyboard or gamepad.
Usability Tiers for Keyboard & Mouse controls
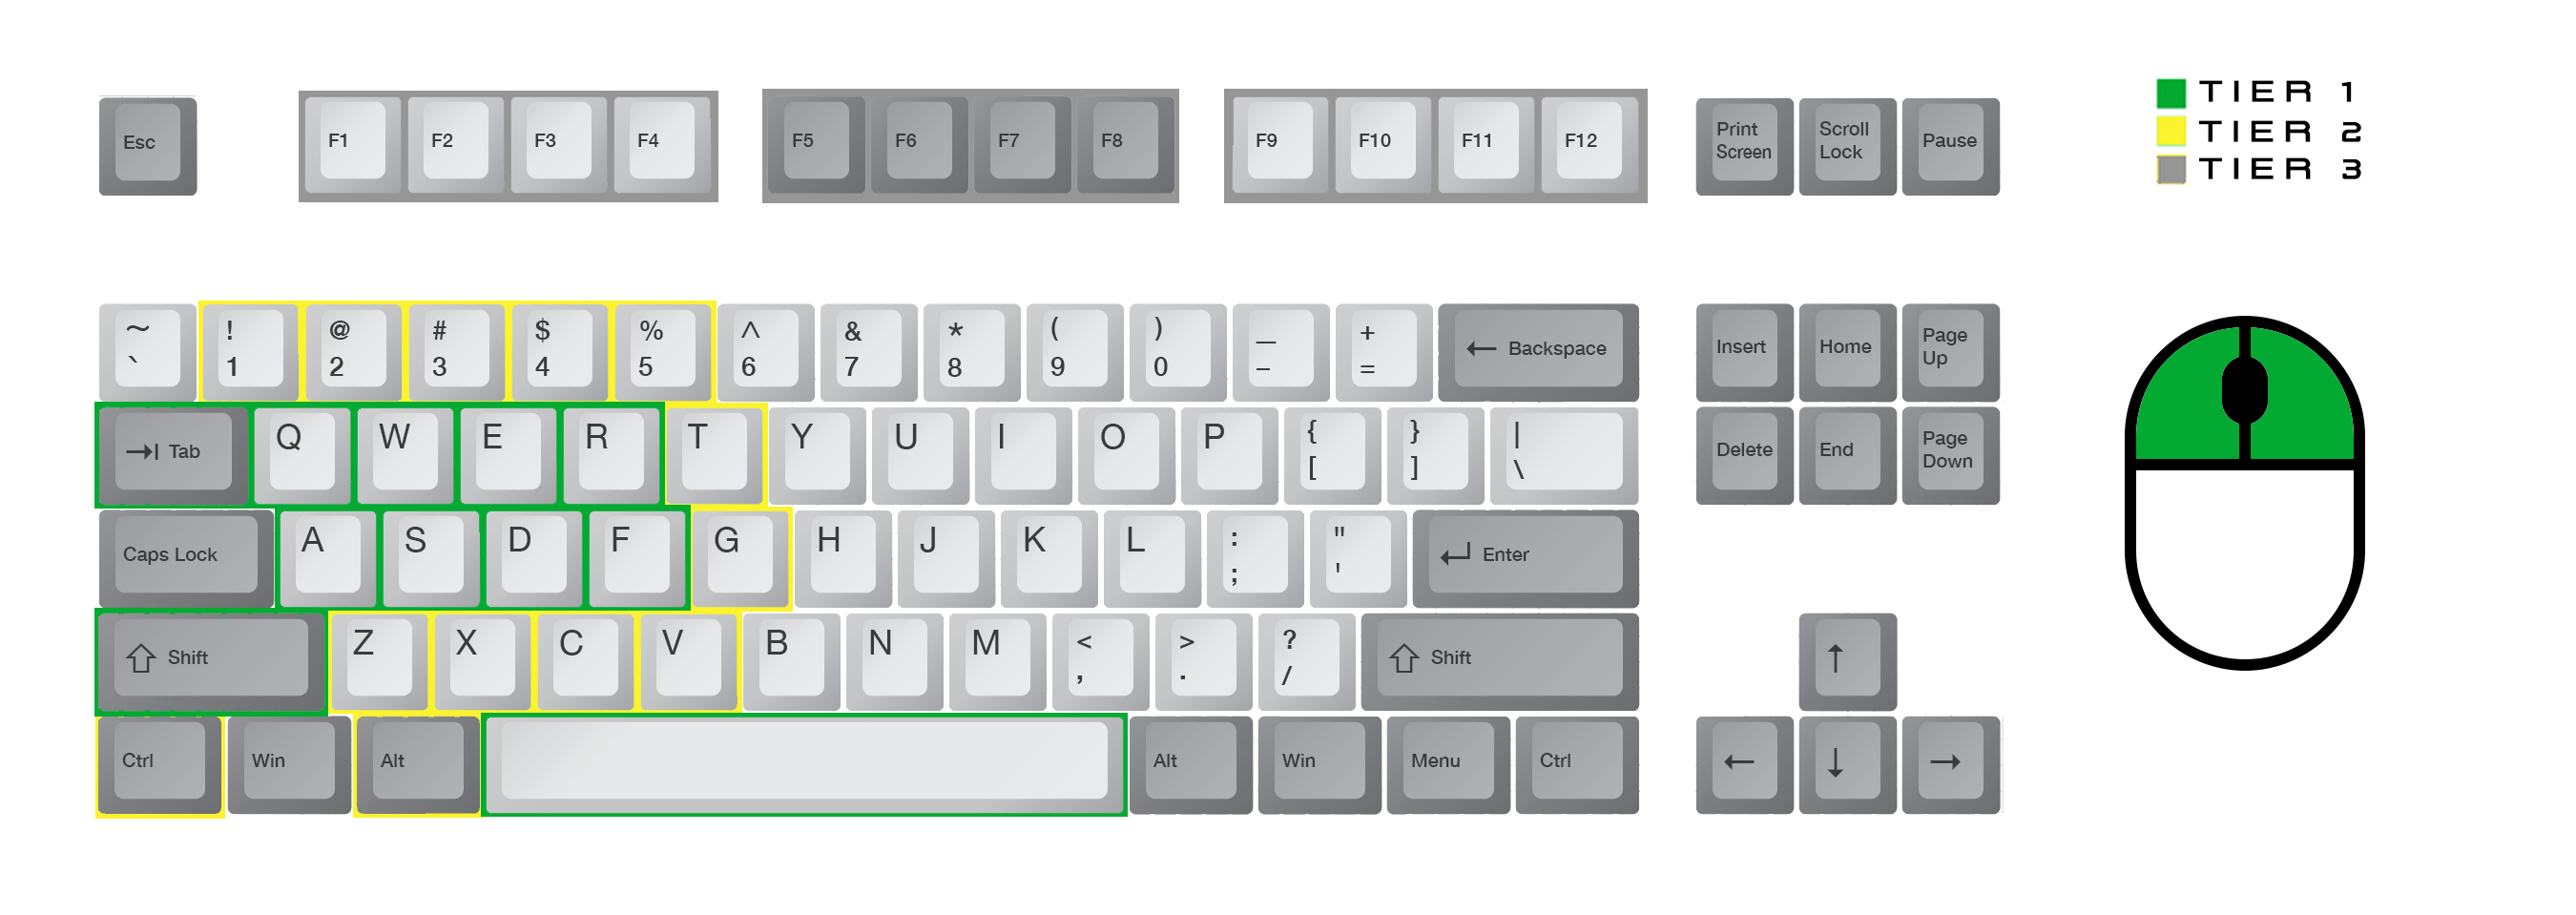
| Tier 1 | Tier 2 | Tier 3 |
|---|---|---|
| WASD + Q/E/R/F | Numerical keys 1-5 | F1-F12 |
| Space/Shift/Tab | Z/X/C/V/T/G | Right side of the keyboard according to the Fitts’ Law (the shortest finger trajectories) |
| LMB/RMB/MMB | Ctrl/Alt | Any action that requires to move the hand |
Usability Tiers for Gamepad controls

| Tier 1 | Tier 2 | Tier 3 |
|---|---|---|
| A/X | B/Y | Start/Back |
| Sticks | DPAD | |
| LT/RT | LB/RB |
Controls Attention Limit
The amount of attention the player can dedicate to the controls is quite limited, and different for the various types of actions:
- Primary Actions – require active decision-making, the main “verbs”/basic mechanics that the player use. Might include more than one basic inputs (aim & shoot, moving & jumping, etc.). Require constant attention from the player.
- State Change – actions that switch control modes (hold button to aim, hold the button to run, etc.). Slightly increase the overall level of required attention. Very often, “hold” actions.
- Contextual Actions – appear from time to time in the context of the primary “Verbs” (reload the weapon, interact, use a special ability, etc.). Require short-term periods of high attention from the player.
From practice and numerous observations, the approximate maximum limit of simultaneous actions (for each hand) is: one primary action, one state change, and one contextual action.
So, by both hands, the player can simultaneously control (~approximately) two primary actions, two state changes, and two contextual actions. We should also keep in mind that one hand is always primary, so actions that require more precision should be assigned to the primary hand.
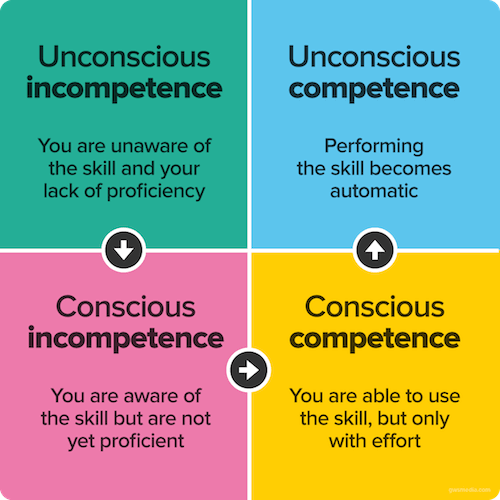
To overcome the attention limit to a certain degree, we can move player actions to automated state (from Unconscious Incompetence to Unconscious Competence).
If the player repeatedly performs a certain activity, eventually, it will be moved to a habit and become automated (thus, requiring much less attention). In order to do so, we need to provide efficient and easy to learn Control Mappings.
Control Mappings
There are multiple ways to make the learning of the game controls easier for the player, and help to move as many actions as possible to an automated state.
Standard Conventions
One of the most common ways to make the learning easier is to use standard conventions that are common to the genre. In many, many cases, standard conventions will have a priority over the efficiency of controls – almost always, people prefer a familiar but inefficient way to do something over an unfamiliar but efficient way. This allows us to save very precious attentional resources of the brain.
Spatial Similarity
Sometimes, you might not have a standard convention to use. In such case, use mental models from the real life. These mental models should have spatial and physical similarity with the player’s actions with the input device (e.g. trigger to shoot, an upper button to [up], a lower button to [down], etc.).
Conceptual Similarity (Grouping)
People learn and memorize by making patterns. To decrease memory load and improve learning, divide controls into logical groups:
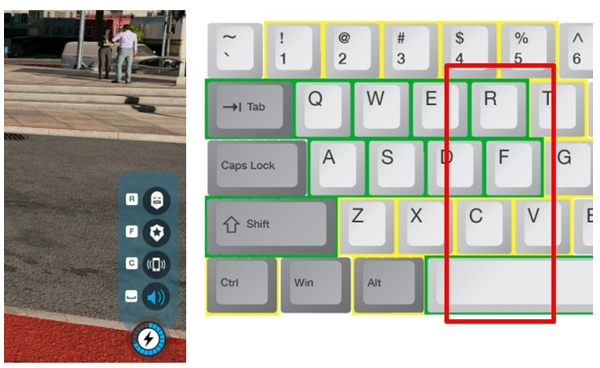
- Similar actions should be in one group – all move actions are in one group, all combat actions in another group, etc. Grouped actions that are related to one basic mechanic (combat, driving, navigation, etc.) are much easier to move to automated state (WASD).
- Groups should take in account hand limitations – should match usability tiers.
- Groups should be consistent, if you have more than one layout – similar actions in different layouts/contexts should work on the same button (e.g. “Sprint” on [Shift] in On Foot layout and “Nitro” on [Shift] in Driving layout).
- Two biggest groups are the player’s two hands – if you have two important actions (or groups of actions) that the player should use simultaneously, divide them between two hands, it will make memorization easier.
Physical (Keystroke) Consistency
Similar physical actions should work in a similar way:
- Similar type of character abilities are activated/aimed in a similar way.
- Similar type of weapons have similar shooting controls.
- Similar UI elements/screens are controlled by similar controls.
- Etc.
Responsiveness Metrics
I bet you heard many time that the game controls must be responsive, but what does it mean in practice? Luckily, HCI (Human-Computer Interaction) provides us with the actual responsiveness metrics.
Let’s start with the human action cycle in context of the game controls (you can find more general details about it in my old article) and its metrics for every interaction stage.
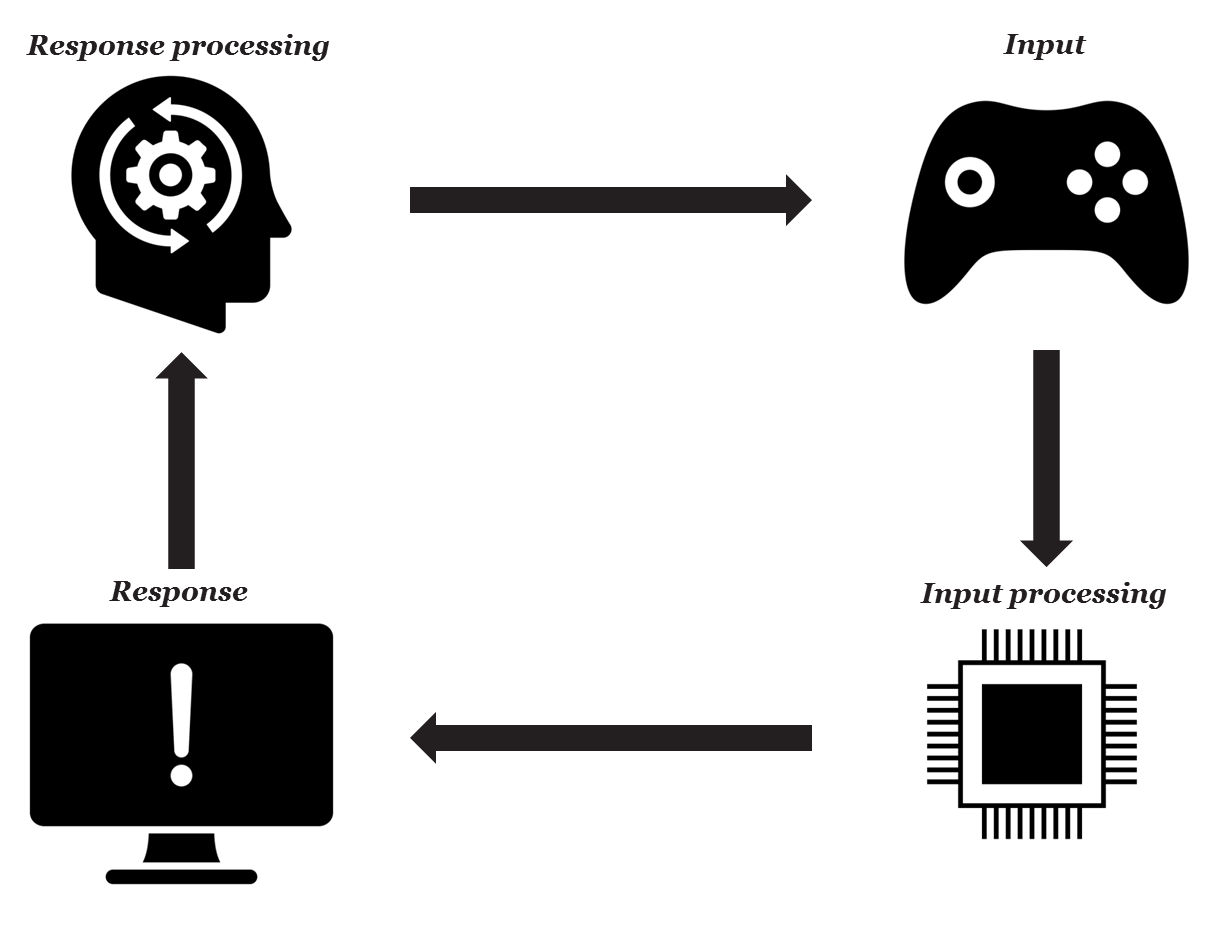
The average duration of the smallest interaction loop is ~240 ms, and consist of three stages that involve the Perceptual, Cognitive, and Motor Processor:
- Perceptual Processor (perceiving on-screen feedback): ~100 ms [50-200]
- Cognitive Processor (processing perceived feedback): ~70 ms [25-170]
- Motor Processor (using input device to send the input signal): ~70 ms [30-100]
As you can see, average human perception window to notice that something has changed on the screen is ~100 ms. This is a time frame when the player expects to see start of the motion after the button was pressed.
Here are some actual HCI metrics for the Interactive System Design that can be useful, starting from the base ~100 ms of the interaction loop and beyond that.
| Deadline | Perceptual and Cognitive Functions | Deadlines for Interactive System Design |
|---|---|---|
| 0.1 sec/100 ms | Involuntary eye movement (saccade) Perceptual-motor feedback Perception of cause and effect Object identification Visual fusion (e.g. animation) Perceiving the number of one to four items | Feedback for successful hand-eye coordination (any controls interaction) Feedback for click on button Displaying “busy” indicators Max interval between animation frames Tolerable “slop” in synching sound with visual events Assume users can “count” one to four screen items in ~100 ms, but more than four takes 300 ms per item |
| 1 sec | Visual-motor reaction time for unexpected events Attentional “blink” | Displaying progress indicators for long operations Finishing user-requested operations (e.g. open new window, activating ability) Time after information presentation that can be used for other computations (e.g. to make inactive objects active) Required wait time after presenting important information before presenting more |
| 10 sec | Unbroken concentration on a task Unit task: one part of a larger task (~6-30 seconds) | Completing one step of multistep task Completing user input to a long operation |
| 100 sec | Critical decision in stressful/emergency situation | Assure that all information required for a decision is provided or can be found within this time |
Responsiveness Time Examples
Responsiveness metrics for some common gameplay actions might look like this:
- Simple Reaction Time – press of a button after receiving a well-learned stimuli (simple & familiar gameplay action done countless times): ~240 ms [100-400]
- Recognition + Reaction – press of a button after recognition/long-term memory data match (familiar gameplay action done rarely): ~310 ms [130-640]
- Recall + Reaction – press of a button without hints (recalling keyboard hotkey): ~380 ms [155-810]
- Multiple Recall + Reaction – press of a multiple buttons without hints (recalling hotkey combination, or a button sequence): ~450 ms [180-980]
Hick’s Law and Response Time
Hick’s Law can also be applied for cases when response time is quite critical (e.g. like PVP first person shooter), which states that reaction time will increase logarithmically with the number of alternative choices for the player:
| Alternatives | Response Time |
|---|---|
| 1 | ~200 ms |
| 2 | ~300 ms |
| 3-4 | ~400 ms |
| 5-6 | ~500 ms |
| 7-9 | ~600 ms |
| 10 | ~650+ ms |
Aiming & Aim Assists
Aiming Mechanics
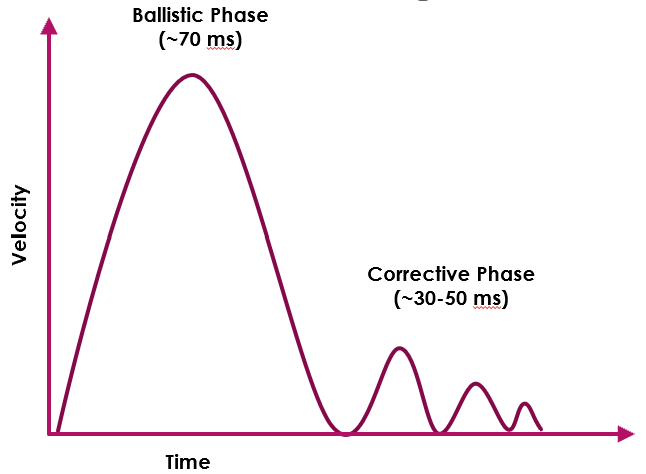
From the HCI perspective, any aiming action (e.g. moving the cursor to the target using some kind of control device, usually mouse or gamepad stick in our case) consist of two phases:
- Ballistic Phase (~70 ms) – basic aiming movement, fairly imprecise, essentially, a shot in the general direction of the target, without much control. Unless the player is incredibly skilled and hit the target after the first movement, the ballistic phase results in a slight overshoot or undershoot. Then, aiming transitions to the next phase.
- Corrective Phase (~30-50 ms) – as the cursor nears the target, the next lower velocity corrective movement is used in the direction of the target. Successively slower corrective movements are applied until the target is acquired.
Common Aiming Actions
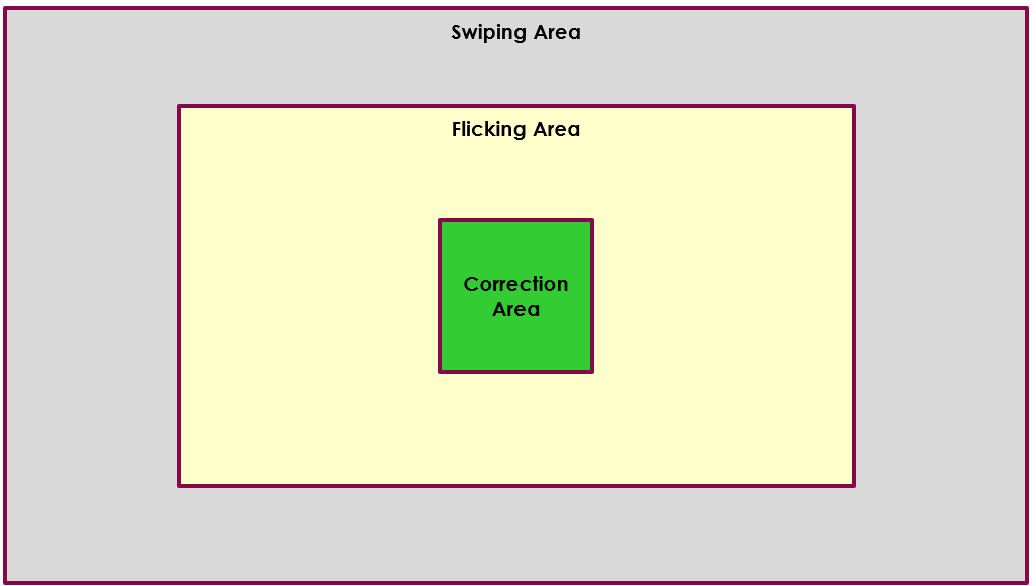
The common player actions while aiming can be split into three major groups:
- Corrections – small crosshair adjustments in the fovea area (e.g. 5-cm square box around the crosshair or ~5 degree of the FOV angle).
- Flicks – quick cursor snapping in the eye saccade distance from the crosshair (e.g. ~40 degree of horizontal FOV angle or 2/3 of the screen area around the crosshair).
- Swipes – quick 90/180 degree turns based on peripheral vision reactions, sometimes requires small head adjustments (e.g. when 20 degree eye saccade isn’t enough).
Device Operating Range
The device aiming precision and comfort of various aiming actions are defined by the Device Operating Range – the maximum area of unconstrained physical movement. The operating range is different for various input devices.
Aiming With The Mouse
In most cases, the mouse doesn’t require any aiming assistance except well-tuned basic sensitivity, and allows a wide range of movements for each aiming action:
Corrections & Tracking
Small mouse adjustments used for the aiming corrections and tracking of the moving targets. Primarily controlled by the fingers and the fingertips of the side fingers on the mouse. Pretty slow movement that often requires conscious attention, especially for the low-skilled players.
Flicking

Snapping the crosshair from one point to another, with the flick of the hand and wrist, in the area of one eye saccade distance from the crosshair (e.g. 15-20 degrees angle left/right/up/down). The action accuracy is limited by the hand movement range, when the bigger movement range is needed (e.g. you need to move the hand), the accuracy will be lower.
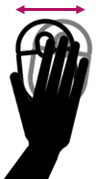
Swiping
90/180 degree camera turns, when crosshair has to be moved beyond the range of the wrist flick to react to an event in the peripheral vision. Swiping requires an elbow joint rotation and limited by the movement range of it.
Vertical Movements
Slightly harder to perform as they require to move the hand farther or closer to the body, or using the space between the hand and the mouse. Usually, the mouse vertical movements don’t require additional aiming assists, and difficulties can be fixed by adjusting of the player’s posture (so it wouldn’t create unnecessary friction points while moving the mouse vertically).
Aiming With The Gamepad
Unlike the mouse, the operating range of the standard gamepad thumbstick is quite limited. Without special hardware additions (e.g. Kontrol Freek stick extenders), it’s pretty hard to perform high-precision aiming movement with the stick, unless sensitivity is set to be very low. With the very low sensitivity, however, it is very hard to navigate in the game space.
The problem of the balance between precise/slow and quick stick movements is usually solved by using of different aiming modes (e.g. ADS), signal filtering (e.g. applying input curves) and aiming assists.
The common thumbstick actions that can be performed by the player can be split into three categories:
- Slow Movements – small and constant adjustments of the thumbstick, usually in the middle of the input range. With a standard stick, however, precision of such movements is much lower than with the mouse, especially done under stress.
- Clicks – short, full force corrective adjustments (~100-120 ms each), used at the corrective phase of the aiming, instead of the small stick adjustments. For a low-skilled player, it’s very hard to do small corrective actions within a standard stick operating range, especially under stress. Instead, they do short, but full force movements.
- Full Range Movements – full force, longer movements, used for flicking or 90/180 degree turns and navigation in the game space. Can be pretty hard to do when sensitivity is set to low.
The common aiming scenarios are applied to the gamepad as well, but unlike the mouse aiming, some input filtering and aiming assists may be required to achieve the player’s comfort.
Correction & Tracking
Small corrective movements and tracking can be pretty hard to do effectively with the gamepad, so various techniques are used to solve this:
- ADS Mode – a separate aiming mode for the weapon, with a different sensitivity.
- Input Curve – signal filtering, tailored to have lower sensitivity at the starting input range (e.g. first ~30-50% of the input range).
- Aiming Assists – usually, lowers the sensitivity near the target (friction), or stick the crosshair to the target to improve tracking (magnetism).
Flicking
The first (ballistic) phase is relatively easy to do with the gamepad stick, if the sensitivity is withing comfortable range. The second (corrective) phase, however, might need the helpers mention above.
Swiping
Might be pretty hard to do with the sensitivity set up for the comfortable aiming, so the input curve or acceleration is commonly used to help in performing of 90/180 degree turns.
Vertical Movement
Muscles that control vertical aiming are much weaker than the ones controlling the horizontal aiming. To achieve the player’s comfort, you might want to make the vertical aiming sensitivity for the gamepad lower than the horizontal one (~30-50% of the horizontal).
Finding Default Sensitivity
Mouse Default Sensitivity
To find the default mouse aiming sensitivity:
- Define what is your default mouse DPI (e.g. usually 800/1000 for modern devices).
- Find the value where you do 360 turn by moving the mouse from one end of the mouse pad to another (e.g. 30-45 cm).
- Use it as a starting point in balancing, whether you want the sensitivity to be in the higher range or in the lower range.
Lower range is more accessible, as it requires less skill/dexterity from the player, and easier to keep stable under stress. Don’t go too low though, as it’ll require more hand movement and increase the player’s fatigue. Also, because it requires more space, it’s harder to make lower sensitivity aiming consistent (thus, it has a lower skill ceiling than the higher sensitivity).
Higher sensitivity range, however, requires a considerable amount of practice to be used effectively, but it also has a higher skill ceiling.
Gamepad Default Sensitivity
As previously mentioned, finding a comfortable gamepad aiming sensitivity is about finding the balance between slow precision aiming/tracking and quick turns. Within the standard operating range of the gamepad stick, it’s usually hard to achieve both, so various signal filtering curves and aiming assists methods are used.
To find starting balancing point for the gamepad sensitivity, several metrics can be used:
- Aim at the target and then do 360 degree turn: the aiming sensitivity should be slow enough to create a perception window, which is long enough to stop the crosshair at your target after the turn, for relatively non-skilled player.
- Repeat the same test for 45/90/180 degree turns, and vertical sensitivity. To achieve the player’s comfort, you may need to tune your aiming response curve so that various turn angles have different sensitivities.
- Repeat these tests (45/90/180/360/vertical) for targets that are in close/medium/long range.
Keep in mind that skilled gamepad players often use the movement stick to help with the aiming:
- At longer ranges, strafing with the movement stick is used for small corrections.
- At medium ranges, two sticks work together – the aiming stick keeps aim steady, the movement stick does corrective actions.
Weber-Fechner Law
While designing and tuning control sensitivity, it’s also useful to keep in mind the Weber-Fechner Law, which essentially says that the greater the physical intensity, the more difference between two magnitudes we need to detect a difference (we can detect a difference between 100-200 values easily, but may have difficulties to detect a difference between 1100-1200 values). The relationship between actual physical stimulus intensity and its perceived intensity is logarithmic, not linear.
There are certain practical applications of the Weber-Fechner Law:
- For actions that require a lot of physical efforts, players might not notice the difference when you change the balance parameters (so it might not make sense to increase the required intensity of such action over a certain threshold).
- Low sensitivity settings of your controls will be more frequently used, as it is where the players can actually feel the difference (so you may consider giving them more room to tweak the low sensitivity range).
Aim Assists
Aim Assist and Player Intent
The primary goal of the aiming assistance is to seamlessly communicate the player’s intent in the game space. Without significant training, the players are not capable to perform perfect raw input, but they still expect the system to do approximately what they want.
Players want to feel like they’re being challenged…but they also want to succeed. Because of that, players are ready to accept a certain level of assistance from the game, but only to an extent when it doesn’t feel like cheating.
The degree of the game’s help acceptance is usually based on the precision level of the input device (while aim assists might feel inappropriate for the mouse, it will be much better accepted and even expected for the gamepad aiming).
Aim Assist and Fitts’ Law
As previously mentioned, any aiming action consists of two stages: ballistic (the initial impulse to move the crosshair towards the target), and corrective (small corrective movements to focus on the target).
From the HCI point of view, Aim Assist is an application of the Fitts’ Law (the bigger the target, and the shorter the distance, the easier is to hit it). The common aiming assistance techniques usually focus on one of the aiming action phases (ballistic or corrective), reducing the distance to the target (simplifying ballistic phase), or increasing the target size (simplifying corrective phase).
Aim Assist and Response Curves
Response curves are usually used in addition to the aiming assistance with the gamepad aiming. Most games provide a selection of various easing functions (specific implementation may vary depending on the game), with a split into low values at the beginning of the curve for precision aiming, and high values at the end of the curve for faster 90/180 degree turns.
Also, many games provide a linear (raw input) curve option to support some controller models (e.g. Xbox Elite) that allow to use a custom response curve on top of the game’s input.
One of the common types of response curves are Easing Functions (or Cubic Bezier Curves). These are useful for simulation of various movement/acceleration/material type, as objects in real life don’t just start and stop instantly, and almost never move at a constant speed.
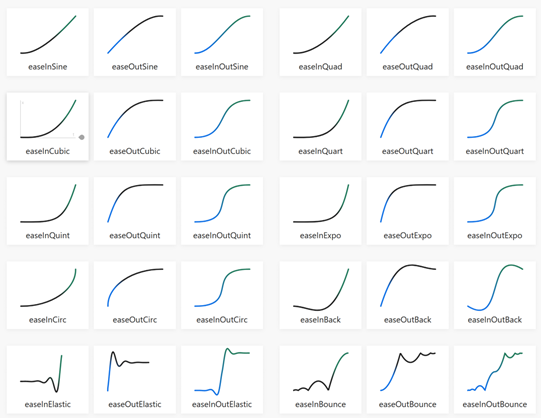
You can find plenty of good Easing Curves examples here.
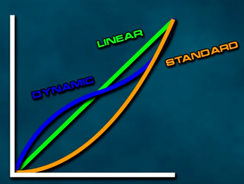
As an example, we can take a look at Call of Duty response curves:
- Standard – the most commonly used in FPS type of the response curve, with a goal to negate full-force thumbstick movements in the first 3-4 frames for a better aiming precision, but still provide enough acceleration for 90/180 degree turns. This type of the response curve can be used in games in many variations, with a different balance between precision/turn speed.
- Dynamic – supports quick turning for the players who like to move a lot in combat, but clamp the input value at some point of the curve before the full acceleration to help landing flicking shots.
- Linear – provides 1:1 (or with a fixed multiplier) communication of the game’s input. Usually needed to support custom curves from the external controller software, but can also be used by skilled players due to high level of predictability.
Common Aim Assist Types
Some of the commonly used aim assist techniques:
- Friction – reducing the aiming sensitivity whenever cursor is near the target. Shortens and simplifies a ballistic phase of the aiming, and increases the time frame for a corrective phase. Works well for static targets, but friction has a fundamental flaw, that if the target is moving closer to your maximum turning speed, you may never catch up it.
- Target Magnetism – drag or stick the crosshair to the target, increasing the size of the target and simplifying the corrective phase of the aiming.
- Bullet Magnetism – “bends” the weapon projectiles towards the closest target, if it’s in the activation range, essentially increasing the size of the target.
- Area Cursor – increase the targeting area while aiming (e.g. making the targeting cursor bigger), detecting a hit while the cursor centre is still at some distance from the target, decreasing the distance to the target that way.
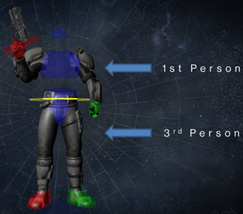
- Target Lock – moves the crosshair to the closest target, when aiming button is pressed. In terms of Fitt’s Law, reduces the distance to the target to zero. Pretty common in 3rd person games. However, might have a problem when prioritising targets. Can be used in combination with the Area Cursor (e.g. Watch Dogs hacking).
These aim assists can also be used as a combination of multiple mechanics, when one or the other aim assists activates depending on the game context.
Aim Assist Additional Factors
There are other various factors that impact the aim assist behaviour you may want to consider:
- Feeling Of Control – Bullet Magnetism and Area Cursor seem to be less noticeable/better accepted by the players, as they’re not interfering with the player’s intent.
- Close/Large Target – you might want to turn off the aim assist for a very large target. The same goes for the targets closer than a certain distance threshold.
- Fast-Moving Targets – you might want to turn off the aim assist for fast-moving or unpredictable targets to avoid the crosshair being dragged in an unpredictable way.
- Multiple Targets – you might want to temporarily turn the aim assist off when the player is facing multiple targets to allow more control.
- Interruptions – if the player is already shooting at a target, the aim assist should ignore other targets appearing on screen (e.g. the crosshair should not suddenly jump away from the current player’s target).
- ADS/Scope Mode – you might want to turn off or reduce the aiming assistance for weapon in ADS or Scope Mode (as the whole point of these modes is to lower the sensitivity but give the player more precise aiming control traded for speed).
Note that written above are recommendations, not requirements, and may greatly depend on the context of your game.
Character Perception
The last component of the character feel is a character perception, which I would divide into two main categories: Readability (the character actions are clear and readable), and Context (the character is aware of the environment).
First Person Character Readability
Screen frame in the 1st person game can be divided into 3 layers:
- Scene – the game world.
- Character – mostly, the character’s hands that are holding the weapon (or some tool, because first person game are not only first person shooters).
- HUD (head-up display) – the user interface that provides gameplay feedback.
The character layer lives in-between the game world and HUD, attached to the camera and usually has its own, independent FOV.

The screen composition for a first person game might look the following way:
- Weapon/tool should not cover The Combat Corridor and Aiming Zone. The same is true for the 1st person weapon animation – it should stay in the Safe Zone and do not overlap The Combat Corridor.
- Weapon and hands are often in one-point perspective towards the crosshair, all the weapon lines are aligned towards the crosshair to create better immersion, make the weapon feel as part of the game world.
- The Aiming Zone is the most important space on the screen (the eye travels around the aiming reticle most of the time), so the most important gameplay feedback can be communicated via the reticle state, visual elements around it, or the 1st person animation guiding to the Aiming Zone.
There’s also a brilliant talk from Bungie, called The Art of Destiny’s First-Person Animation, with some of these principles covered in more details.
First Person Character Context
The key components that put the character in the context of the game world are Spatial Awareness and Situational Awareness.
Spatial Awareness
The character is aware of the physical environment, and is able to react/interact with it:
- Traversal takes the environment into account (e.g. different animations to jump over different obstacles, proper foot and hand placing during traversal, etc.).
- Character can interact with the environment (e.g. pushing doors/other characters, grabbing objects, etc.).
- Character body can react on a smaller scale during performing of various actions (e.g. weapon recoil that impacts a body position a little, minor changes in the posture while interacting with the environment, etc.).
Situational Awareness
The character is aware of the events and other characters, and is able to react/interact with them:
- Character reacts to changes in the environment (e.g. turning the head to look at the point/character of interest, reacting to danger, etc.).
- Character state reacts according to the gameplay context (e.g. putting on a hood while in stealth mode, unholstering a weapon during combat, etc.).
- Character can perform social interaction with other characters/NPCs (e.g. look at them, push away other characters while going through the crowd, reacts to gestures of other characters, etc.).
In addition, there’s detailed, very technical talk called In Your Hands: The Character (of Watch_Dogs) about Watch Dogs character animation system, and how the game character interacts with the environment.

First Person Context Limitations
The 1st person view is quite limited in its means to communicate the character’s connection to the game world, and also requires some traversal assists mechanics for a comfortable navigation in the game world.
The key components to put the 1st person character in the context of the game world are:
- Weapon/Tool – one of the primary components of the 1st person view to provide feedback for almost every character action (e.g. the weapon reacts to moving, jumping, traversal, etc.). As already mentioned, it exist in a separate layer between the game world and the HUD, and has a fixed perspective camera, which in turns, allows various 1st person animation tricks (e.g. scaling to communicate changes in the weapons state better).
- 1st Person Arms – same as in 3rd person view, arms can react to the environment and events in it, and support using of tools/gadgets in combination with weapons. The only information you have about the body of your character in first-person is the visual channel, so it’s useful to show the body parts on the screen for 7-10 frames while the character is performing actions (e.g. arm on the screen while throwing grenade).
- 1st Person Lower Body – although often optional, it can provide additional feedback, especially if your character has to perform complex traversal moves. Implementation may wary – it can be always visible lower body that uses 3rd person character model, or “legs on demand” that are displayed only while performing certain traversal moves, like vaulting or using zipline.
- 1st Person Camera – in combination with other elements, helps to communicate the character weight and speed/acceleration. The camera shake, sway, rotation and translation helps to communicate the character weight and inertia. The camera FOV changes help to communicate very quick acceleration (e.g. Slide or Dash).
- Audio Feedback – sound, combined with the animation and camera work, helps to communicate the character state better (e.g. grunts, pain, strain exertion, etc.).
- Minimap/Radar – however close to the real perception the 1st person view feels, it still doesn’t fully communicate all senses of the human body. Minimap serves a function that otherwise would be done by kinesthetics, wider FOV of the human vision and 3D sound perception of our ears.
- Screen Space Effects – unlike the 3rd person view, the player doesn’t see the full character body, and some state changes must be communicated via screen space effects (e.g. low health, hit direction, etc.).
First Person Traversal Assists
Complicated character traversal in first person might be quite tricky, as the player’s world perception is still very different from the real world, especially when it comes to judging the distance or avoiding small obstacles.
To achieve comfortable first person navigation through the environment, you may want to use a set of traversal assists:
- Auto-step/Auto-vault – some obstacles will be barely visible in the 1st person, so you will need auto-step/auto-vault over small obstacles.
- Auto-strafe – slight adjustment of the character position while colliding with the small obstacles in the peripheral area so it wouldn’t destroy the forward momentum.
- Coyote Time – jumping/vaulting and judging of the distance is much harder in 1st person, so it requires a reasonable input forgiveness (so the jump could still be triggered a few frames after falling from the ledge).
- Shin Saving – ensures the player makes any jump that was barely missed due to foot clipping (e.g. if the lowest region of the collision capsule collides with a corner edge in air & forward input is given, the player is corrected onto the surface).
- Jump Buffering – pressing jump before the character touches the ground will trigger the jump as soon as the character land.
- Air Control Assists – depending on the context of your game, you may want to consider adding extra assists for better air control, like limited air steering or clamping falling speed.
Motion Sickness Prevention
Lastly, I’d like to talk about a unique distinction and one of the biggest problems of a first person view – its ability to cause the motion sickness.
For such a common problem, there’s surpisingly little research about the motion sickness, especially in the gaming context (outside, perhaps, VR space where they have to deal with the problem all the time). One of the popular theories about the motion sickness is when what you see and what your body feel do not match, your brain thinks that your having hallucinations as a result of being poisoned (and, well, try to remove the poison from the body).
There are three main sources of the motion sickness:
- Visuo-Vestibular Conflict – what you see is different from what your vestibular feels.
- Postural Instability – you cannot reliably determine your body’s position in space.
- Optical Flow Overload – what you see is very different from what you expect, which in turn, requires you to do more eye tracking.
These three motion sickness sources can be addressed through a Motion Connection, Clear Character Position, and Limited Optical Flow.
Motion Connection
Motion on the screen should be clearly connected to the character’s body in 1st person.
The game camera behaviour is predictable to the player:
- There are no strong & sudden camera shakes, and drastic FOV changes.
- There are no cases where the camera is moving in a different direction than the character’s body (e.g. moving the camera back while the character is moving forward).
The player is always in control of the movement (being in control of a movement that your brain see as “wrong” seems to reduce the motion sickness):
- Input is responsive and latency (e.g. visible delay between input and action) is kept to a minimum.
- The camera as punctuation – any camera movement is quickly re-centered after the camera was moved.
- There are no long sequences with an active camera movements without the player control, or they’re kept to a minimum.
Animation, Signs & Feedback clearly communicate the character state and changes in it via first person animations, crosshair, HUD and audio feedback
Clear Character Position
The player should always be able to determine the position of the controlled character in the game space.
Having stable elements on the screen allows the player vision to auto-correct the picture on the screen to maintain the feeling of balance (this is our main biological mechanism to filter the visual perception, for example, when we walk – the camera usually doesn’t have such a mechanism):
- The crosshair is always present on the screen as a stable visual element.
- The weapon/tool is always present on the screen as a stable visual element.
Animation, Signs & Feedback help to communicate the character position in the game world:
- The character body is displayed in the 1st person view/interaction with the game world is communicated by the character body animations.
- Spatial audio feedback helps to determine the character’s position in the game space.
Level Design helps to communicate the character position in the game world:
- The game level design provides big visual landmarks & clear horizon line.
- The game level design provides clear visible paths & navigational guidelines in the game world.
Camera movements and position do not create an extra motion sickness impact:
- Movements with visible acceleration or deceleration are kept to a minimum.
- Up/Downward/Backward movements do not include any acceleration/deceleration or other sickness-inducing effects.
- Head-bobbing effect is kept to a minimum (or not present at all).
- Horizontal/Vertical camera movements are used instead of Pitch/Roll – Camera dynamically moves up and down during traversal, instead of just rotating it (e.g. while vaulting).
- Movements with the low camera position (e.g. Crouch) include minimum acceleration/deceleration or other sickness-inducing effects.
Limited Optical Flow
The game shouldn’t have too much quick-moving objects that require a lot gaze movement to track.
The game doesn’t overload the player’s vision:
- The number of the simultaneous moving objects on the screen doesn’t overload the player’s gaze (don’t require a lot of eye tracking).
- Flickering and low framerate don’t create an extra eye strain.
- Effects that are inducing the motion sickness, don’t impact the player for too long (the motion sickness impact seems to be cumulative, and increases the longer the exposure to the sickness-inducing situation, so the game should allow the player’s vision some periods of rest).
- The game world doesn’t contain too many bright colours and extra complex geometry that can overload the player perception (it seems to be working similarly to an ‘Uncanny Valley’ effect – stylised graphics with a simpler presentation reduces the motion sickness, but at the cost of the visual fidelity).
